INET 1890: Introduction to Web Design (3 credits) ==
Mon, Tues, Wed, Thurs from 1:00pm –1:50pm
The Big Presentation List — FINAL — WED DECEMBER 14TH @ 8AM – 10AM
=================================
Your Presentation should be atleast 4 minutes… You might want to try using Prezi?
2 – Demonstrate in atleast 1 example how you manipulated the code.
3 — Show drawing outlines of your initial plan, the areas that you looked for research… Who are you building your site for… Why are you building it?
4 — Discuss your motive… what stylistic path did you take when you started out with your design?
For example: I wanted to move my header bar askew, because I was trying to
5 — Explain an emotion you tried to create…
For example: I wanted to create relaxation with the image of the sky… As the sky makes the viewer feel open space …
Here are some descriptions of the psychological effects:
http://www.precisionintermedia.com/color.html
========================================================================
First Things First… How was your thanksgiving? How was your Black Friday?
Second thing is Second… Our final class is on the 14th of December… Your current work… will culminate to your final projects and final works!! Be sure to give it your all.. and persuade us of its magnificence in your presentation/demonstration on the 14th of December beginning at 6pm!!
Class in the coming weeks will continue to demonstrate how to add attributes that will enhance your pages… you will be provided time to work on your projects in class… Don’t pass up the opportunity to discuss your sites with your fellow classmates and with me … This is your new web developer community… ![]()
======================================================
Ok… Lets get back in the mood of html and our content management systems with the creation of a favicon…
What is a Favicon?
Favicon’s are the little images… with the funny file ending… (.ico) … that appear to the left of the URL in web browsers. The primary function of the favicon is for that little (.ico) or image to display in the bookmarks bar of individuals who have come to enjoy the bounty gifts that of your site has to offer… and ofcourse those individuals bookmark your page… to return later…
The mighty favicon also displays in browsers that are tabbed for browsing (almost all modern browsers), this will help you identify between each tab..
The First Implementation of Favicons
The first implementation of favicons was in Internet Explorer 4, and it required you to upload the file favicon.ico to the root of your web server which would in turn load that image into the bookmark section in IE4. Once other browsers started implementing this favicons a better technique was needed. It came by way of HTML, you could now link to the favicon.ico which means you could have multiple favicons for one website or be able to place the favicon wherever you please on the server.
======================================================
Here are some nice favicon examples:
http://www.colourlovers.com/blog
——————————————————–
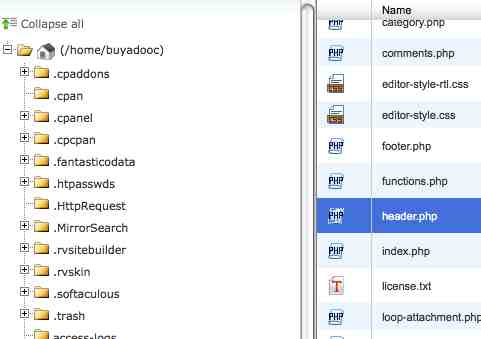
1st… DOWNLOAD – the header.php… from the twenty ten theme…
(File path: Your site folder -> Wp-Content -> Themes -> Twenty Ten -> header.php )

2nd… UPLOAD — the header.php… into your child theme directory…
======================================================
DISCUSSION:
– WHY DO WE NEED TO UPLOAD A DUPLICATE FILE INTO OUR CHILD THEME FOLDER?
– WHAT WOULD HAPPEN IF WE DIDN’T ADD THE DUPLICATE HEADER.PHP FILE TO OUR THEME?
– IF WE BUNGLED UP THE THE HEADER.PHP FILE… HOW COULD WE REFRESH OR REBOOT OUR SITE CONTENTS?
YOU CAN CLICK ON THIS LINK TO RECEIVE THE TWENTY TEN HEADER.PHP FILE
======================================================
YOU WILL RECEIVE A VARIATION OF A 404 ERROR.!!.. WHAT IS A 404 ERROR?
========================
3rd… ADD THIS – little bit of text into your new header.php… above the closing slash of the header…
<link rel=”shortcut icon” href=”http://www.buyadoo.com/adapter/wp-content/themes/Adapter/favicon.ico”/>
<link rel=”icon” href=”http://www.buyadoo.com/adapter/wp-content/themes/Adapter/favicon.ico” type=”image/x-ico”/>
place this chunk of code before… the closing of the head ( </head> )
WHERE IS THE CODE SEARCHING FOR OUR FAVICON???
You can click here to download a file with the php code above…
========================
4th… TIME TO GET CREATIVE — Now we need to create our favicon…
Extra points for creating a cool favicon on your own in photoshop or gimp…
A. make sure to use the save for web feature…
B. make sure that your file size is smaller than 5MBs
The second option would be to find an image that you like on the web to to use as your favicon…
Note… be careful not to choose an image that is too detailed…
=============================
5th… Ok… now that you have your image … go to the favicon generator at…
http://www.favicon.cc/
—————————
As you can see there are quite a few options to create your favicon…
… you can draw your own pixels to create a favicon…
… or you can upload import your image…

I recommend choosing the option of shrink to square icon… because we are dealing with a very small surface area… the image will become rasterized… etc…
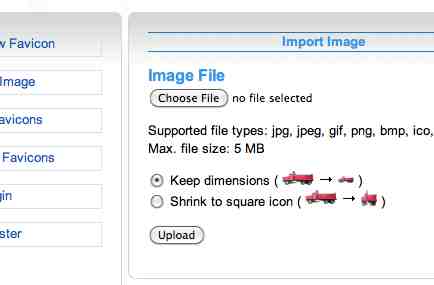
… but you are welcome to try either option and decide your choose…
—————————–
you will notice that the choice you choose will be demonstrated at the top of the page… to provide you with an example…
![]()
———————————
if you are happy with it … go ahead and download…
![]()
———————————–
6th Step... RETURN to your cpanel… and … UPLOAD – your favicon.ico to your child theme folder…
![]()
—————————————————-
7th and Last Step… be sure that your file path in the header.php corresponds to the file path of your newly uploaded favicon!! The file path is the http .. reference url…that is pointing to the .ico file…
<link rel=”shortcut icon” href=”http://www.buyadoo.com/adapter/wp-content/themes/Adapter/favicon.ico”/>
<link rel=”icon” href=”http://www.buyadoo.com/adapter/wp-content/themes/Adapter/favicon.ico” type=”image/x-ico”/>
You can click here to download a file with the php code above…
—————————————————-
CONGRATS!!! YOUR SITE NOW HAS A UNIQUE URL IDENTITY!!!
==================================================
OK… HOW ABOUT WE TAKE A 10 MINUTE BREAK…
IS ANYONE CONFLICTED ON THE SITE THEY WOULD LIKE TO CREATE OR ARE THERE ANY DISCUSSIONS ABOUT THE STYLE THEY ARE THINKING OF?
AND… NOW FOR SOME MORE MODIFICATION TO OUR SITES…

==================================================
IT’S WIDGET TIME!!!!
==================================================
Widget Technology is over 25 years old… They are essentially small compartments of customized desktop and web content… Other names used for widgets are: accessories, a web part, a gadget…
We are now participators in the largest content management platform on the web… Our platform is used by 14.7% of Alexa’s Internet’s “top 1 million” websites.. Alexa is the global leader in analytics that provides an web analysis of the web demographics…
For web development and for our purposes… the advantage is that we are participators in a huge community that houses users, programmers, and designers… and when there are new features desired the community often offers them up for everyone in the community at no charge…
Can some people provide some examples of the widgets or accessories that we can add…??
WHAT IS A WIDGET AREA? HAS ANYONE FOUND SOME FUN USES FOR WIDGET AREAS?
HAS ANYONE PLAYED WITH THE TEXT BOX WIDGET… AND ADDED THEIR OWN HTML CODE?
http://www.vermilliondragon.com/
The programmers and designers offer up these bits of code, accessories, etc… and we can add them as a widget to our already burgeoning system… ITS LIKE BLACK FRIDAY… ALL OVER AGAIN!!

Currently, where are the widgets locate? How would you like more locations to take advantage of this powerful feature…
======================================================
LETS LEARN HOW TO CREATE MORE WIDGETIZED AREAS…
HERE IS THE POWER OF SOME WIDGETIZED AREAS USED ON OTHER SITES…
====================================================
WORKSHOP — Adding More Widgetized Areas
=============================================
1. First Step… we will learn how to add new widgitized areas on our site… ooooh yah!! For Review: where are the widgets located? How do I add more widgets to my page? Has anyone used the text box widget?
————————————————————————————-
2. Second Step… Lets download the header.php file and move it over to our child theme. Why should we be careful with the header on the wordpress content management system?
….. You will see if we take the same approach as we did with footer.php … we will get a blank screen…
————————————————————————————-
YOU CAN CLICK ON THIS LINK TO RECEIVE THE TWENTY TEN HEADER.PHP FILE
Note — if you did the excercise above… you should already have this file…
————————————————————————————-
3. Third Step…. add some code to our functions.php file….
// Area 7, located in the header. Empty by default.
register_sidebar(array(
‘name’=>__(’Your Widget Area’, ‘Adapter’),
‘id’ => ‘my-widget-area’,
‘description’ => __(’The primary widget area’, ‘Adapter’),
‘before_widget’ => ‘<li id=”%1$s” class=”widget-container %2$s”>’,
‘after_widget’ => ‘</li>’,
‘before_title’ => ‘<h3 class=”widget-title”>’,
‘after_title’ => ‘</h3>’,
));
if (!function_exists(’theme_special_nav’)) {
function theme_special_nav() {
// Do something.
}
You can click here to receive a zip file of the above code to place in your functions.php file
————————————————————————————-
4. Change the ‘Adapter’ tags to the name of your childtheme…. so if your child them is named CasperCollege… you would want to change within ‘Adapter’ to ‘CasperCollege’
————————————————————————————-
5. Be sure to either type this code yourself or go into Buyadoo.com’s –> adapter child theme and take the code file, or you can use the links below the code to download… as… you don’t want any syntax to be working improperly…
————————————————————————————-
6. Now add this little chunk of code to the header.php file that we just created and placed in our child theme…
<?php
if ( is_active_sidebar( ‘my-widget-area’ )) {
dynamic_sidebar( ‘my-widget-area’ );
}
?>
You can click here for a php file with the code to the side bar…
————————————————————————————-
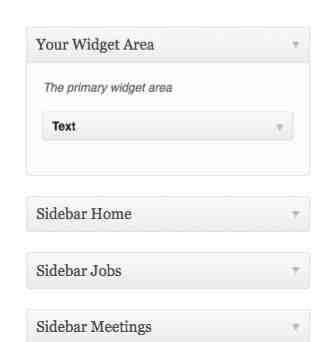
7. Time to Check in on the Backend… open your wp-admin backend, –> Appearance —> Widgets
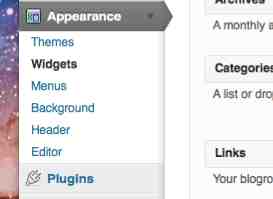
…and you will see the new widget area… a place where you can place widgets in your header….
————————————————————————————-
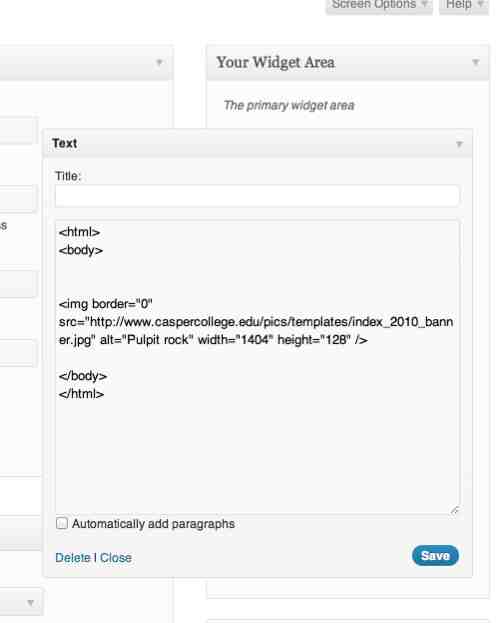
8. Place a text box in that new widgetized area… and for example I placed the casper college banner there:
————————————————————————————-
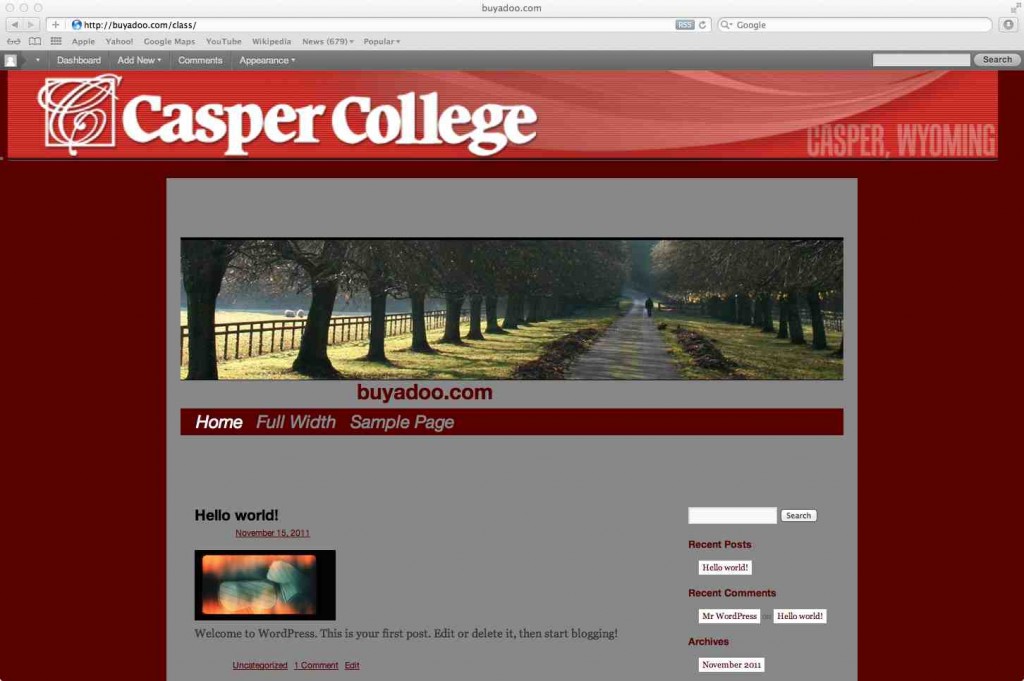
9. There you go… you have just added a header widget area!!!
————————————————————————————-
— Homework/Challenge:
1. Add other features to the widgetized area…
2. Try to figure out how to move the header widget around… hint… style.css
3. Add another widget to the header area… or to another area on your page… me oh my !!!
Extra Credit…
Add a dynamic plugin to the widget area… something with jquery, lightbox, etc…
=============================================
==================================================
==================================================
http://freelancefolder.com/why-every-freelancer-should-slow-down-and-brainstorm/
http://designreviver.com/articles/the-evolution-of-web-design/
http://freelancefolder.com/capturing-your-creativity/
http://www.fuelyourcreativity.com/inspiration-from-across-the-design-spectrum-080709/
==================================================
HAPPY HALLOWEEN!!!

=====================================================
1. HOW DID THE RE-CONFIGURING GO ON YOUR SITES SO FAR?
2. WAS ANYONE ABLE TO FIGURE OUT THE EXTRA CREDIT ON FIXING THE HEAD BANNER… WILL YOU SHOW US?
3. WAS ANYONE ABLE TO FIGURE OUT HOW TO DO SOME REPOSITIONING? TELL US ABOUT YOUR EXPERIENCE AND SHOW US?
4. OK … LET’S FIND OUT HOW TO FIX UP THE FOOTER…
======================================================
FOOTER
1st Step — go into the twenty ten them folders and download the footer.php file onto your desktop…
2nd Step — upload the footer.php file into your child theme folder … the same folder that stores your style.css file… for example my folder is the Adapter folder…
3rd Step — go into the footer.php file and move the
<?php
/*
* move the wrapper up under the main…
*/
?>
</div><!– #wrapper –>
4th Step — Now you are ready!! You can go back into your style.css and begin to play with the footer and its contents…
#footer {
background:none repeat scroll 0 0 #242424;
color#837E76;
margin: 60px auto;
padding: 0 60px;
width: 860px;
height: 300px;
}
5th Step — check out the tricky little colophon — and figure out what you want to do with it…
======================================================
======================================================
In Class Assignment:
– Change around the Positioning of the objects on the page and add your Own Header
– Work on the Footer and the Widget contents in the Footer…
– Find out something creative to do with the colophon…
—————————————
Super Extra Credit — Get Rid of the WordPress Titling ![]()
—————————————
==================================================
==================================================
======================================================
OCTOBER 26TH – WORDPRESS WORKSHOP… FOLLOW THIS LINK…
========================================
– we will first install wordpress on our sites by using the cpanel
– next we will take a little tour of wordpress
– a discussion of the layout of wordpress
===================================
Now we will begin adapting our own theme
===================================
— we will check out the file folders in the cpanel
— refresher on firebug for firefox
— we will begin learning how to create a child theme for own own personal adaptation of the wordpress themes….
===================
Ok… first things first…
1. Lets take a look at our Cpanel!! — Go ahead and log in … and together we will look where the files are ….
2. There are 3 main folders:
WP- Admin == back end stuff … what is that?
WP – Content == themes… like the one will create (adapter)
WP- Includes == the stuff for the front end
3. Without closing your Cpanel, make a new browser window or tab and log into your front end panel (via an internet browser like safari/firefox/etc.) and log into your WordPress Site … do you know how to find it? do you remember your passwords? Make sure to place it in a place you can always get to it….
4. Notice how the folders in the theme folder are also provided under your selections on the back end….
– Go ahead and switch the themes and look at the changes… How are the themes designed (For example: Header, Sidebar, Footer, Body, etc?
——————————————————————————————–
Ok… cool… now we have an idea about the relationship to the cpanel and front end…. do we?
5. Next step…. lets download the plugin of firebug to our browsers if you have not done that already…
— can someone come up to the front and show us how firebug works?
——————————————————————————————–
6. We are going to use firebug in order to bring code from our wordpress theme/site, change it and build a new theme… OUR OWN THEME!! Alright!! — Otherwise known as a child theme… Why is it called a childtheme?
– First lets go to our cpanel again… go to our themes folder… and create a new folder…
– I created Adapter
7. Now go inside Adapter … and page called: style.css
8. On that page… we are going to begin typing a comment area that identifies our theme:
/*
Theme Name: Adapter
Theme URI: http://www.justinhoffman.net
Description: A child theme of Twenty Ten
Author: justin
Author URI: http://www.justinhoffman.net
Template: twentyten
Version: 1.0
*/
9. Next we are going to add a link to the twenty ten theme:
@import url(../twentyten/style.css);
10. Now we can use firebug … go to our previous wordpress site …take some of the code and add updates to the previous theme… for example I chose to change the Menu
/* Menu ![]()
————————- */
#access {
background:#580000 ;
}
#access a {
color: #888888;
display: block;
line-height: 38px;
padding: 0 10px;
text-decoration: none;
}
11. You can keep doing this to change all sorts of different parts of the site… go ahead and try yourselves… Feel free to go to the Adapter folder on the buyadoo server and take the code from the style.css or you can take the entire file…
====ASSIGNMENT / IN CLASS LABORATORY =========================
How to do it? Make a new folder in the cpanel …
— link that folder when you create the style.css file …
— and change your theme to see the result…
1. use this example of wordpress to find code to change…
2. change it yourself with your impressive html skills …
3. or use this link here which is a basic example of the twenty ten theme that we are modifying….
===========================================================
HOMEWORK: Remember… yes you will be graded on participating in the activity … but don’t worry about the appearance… worry more about playing around with learning about design implementations…
===========================================================
==================================
OCTOBER 19TH – PROJECT PRESENTATIONS OF YOUR CSS SITES
3 PAGES — CONTROLLED BY CSS
3 BUTTONS
BUTTONS PERSONALLY CREATED IN PHOTOSHOP, GIMP, ETC…
1 ANIMATED GIF
==================================
SEPTEMBER 28TH — CSS PROJECT WORKSHOP :
3 PAGES — CONTROLLED BY CSS
3 BUTTONS
BUTTONS PERSONALLY CREATED IN PHOTOSHOP, GIMP, ETC…
1 ANIMATED GIF
—- TODAY’S CLASS —
– We Will Learn how to make a pop- up link
Here is a good link that provides a tutorial to how to create html and java pop-ups
== it will work like the link on this class page
This is a good site with code to create a pop up when the page starts…
== it will work like this class page
– We Will Learn how to make an animated gif
==================================
SEPTEMBER 14TH
Creating a Button with CSS —
Check out our two pages on the server:
and
Krystiana’s Presentation References for brushes:
http://browse.deviantart.com/resources/applications/psbrushes/
==================================
SEPTEMBER 7TH — CASCADING STYLE SHEETS
What are Cascading Style Sheets??? HMMM??? Here is a short definition and historical background with references and Links…
Here is a link with the code to make a really basic site !!! please read the basic html document tutorial carefully Here is a link with the code to make a site a little more advanced !!! please read the more advanced code ….
NOTE: YOU MAY HAVE TO RE-WRITE SOME OF THE QUOTATION MARKS IN THE CODE…
www.buyadoo.com/myfirstsite.html
www.buyadoo.com/mysecondsite.html
Here is a link with the code for a css site — !!! please read the basic css document and basic html document … you will need two files!!
check the file: ex1.css – on the server
Here is a link with the code for a little more advanced css site!!! please read the css document and 1page.html document and 2page.html document… notice how easy it is to make more documents with the same style!!
check the file: ex2.css – on the server
—– for more styles, shapes, images, etc… check out W3 Schools reference for CSS :
What happens if I place an image on the server?
making your pictures “web safe” in photoshop and using photoshop for design
- a step by step “save for web” tutorial
- a good philosophical analysis between the difference of “save as” and “save for web”
- making your pictures “webs safe” in photoshop
- using photoshop to design your site
Here is a cool grid layout manager for css…
===============================================================================
Copy of CASPER COLLEGE – WEB DESIGN on Prezi
==================================
Lecture Links:
== Enquire within Everything
http://celticboar.com/texts/enquire.pdf
== Telegram:
http://www.youtube.com/watch?v=Rr0jueXDpzI&feature=fvst
http://www.youtube.com/watch?v=IS3y4nHf8KM
http://www.5min.com/Video/Learn-how-a-Telegraph-Machine-Works-117541596
== Turing Machine
http://www.youtube.com/watch?v=E3keLeMwfHY
==================================
==================================
Our first workshop is the creation of your own website:
please read the the following tutorial carefully
please read the w3school guide to html carelessly
==================================
Our first task is to get comfortable with basic html.
First Step: Download the program Notepad++ — Its free
Second Step: Make a document in notepad with html code and make sure
that the document ends with .htm or .html
— check this link for content you can use to place in the document.
— you can also check out W3C School to get some ideas of extra code
to place in your document…. Go crazy with the Try It Yourself Editor
Third Step: Click on the document you made and open it with a web browser
Fourth Step: Sit back in your chair and smile…
——————————————————-
AUGUST 30TH
——————————————————-
– BEGIN THINKING ABOUT YOUR DOMAIN NAME AND SERVER SPACE…
CLICK HERE TO CHECK OUT WHAT IS AVAILABLE….. —
WORST WEBSITES IN THE WORLD
First Assignment : Create the Worst Web Page In the World
– Learning BBedit
– Access and tutorials for the temporary server, also if you are purchasing a Domain Name and Transferring the Nameservers … follow link for tutorial on transferring nameservers for your domain… the tutorial is at the bottom of the page…
– Building a sound Html Site with 3 links that will direct between each site… For example, Home – Page 1 – Page 2
– There must be atleast 2 pictures between the different pages
– Presentation/Defeding of your “Crazy Bad” Website
========================================
Here is another tutorial example with lots of juicy stylistic choices…
http://www.buyadoo.com/badwebpagewithcode.html
VIEW THE PAGE SOURCE in your browser to see how it is made…
— also follow the link in the example for a cool resource to make funky code…
————————————————————-
Examples of the Worst Web Sites in the World:
http://yvettesbridalformal.com/
http://home.comcast.net/~computerphysicians/
http://hub.webring.org/hub/thegeorgewbushad
=================================================================
links for website creation
- W3schools HTML tag reference
- W3schools CSS tag reference
- Simple tutorial on building pages from the W3C
- Guide to using the CSS float attribute and create column based layouts
- A List Apart – Tons of great tutorials and articles on HTML, CSS and web design in general
- web design library — beginners one-stop resource
design links
- Choosing a color pallette
- Basic design principles (contrast, repetition, alignment, proximity)
- Typograph
- open source web designs lots of sample layouts to choose from
- design meltdown nice collection of multitude of design strategies
- free icons
- designing for how human brains work
- 20 great web design books
- smashing magazine – mag dedicated to web world
making your pictures “web safe” in photoshop and using photoshop for design
- a step by step “save for web” tutorial
- a good philosophical analysis between the difference of “save as” and “save for web”
- making your pictures “webs safe” in photoshop
- using photoshop to design your site
tools
- TextWrangler – text editor for OS X ( For MAC USERS)
- Notepad++ ( For PC USERS)
- JEdit – cross platform text editor
- Photoshop Express – free, web-based image editing
- Gimp – free, open source image editor
- TextMate – my favorite text editor
- Processing
resources
Some sites with new media art:
Rhizome.org
Runme.org
www.we-make-money-not-art.com
networked_performance blog
